Friday, April 27, 2007

Chicken Fajitas


So, I would not say that these fajitas are necessarily the most authentic; it's just my interpretation of a mainstream dish.

These fajitas are great if you are having friends over... you can prep everything ahead of time and just grill the chicken at the end.
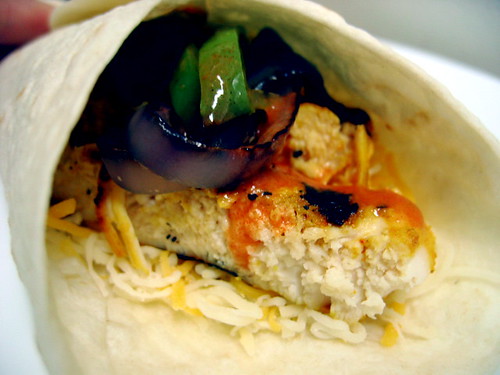
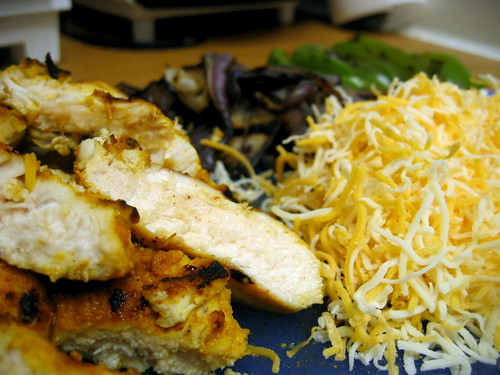
Chicken Fajitas
Serves 4 people (2 fajitas each)

Ingredients
2 chicken breasts, boneless and skinless
1 green pepper, sliced into thin strips
1 red onion, sliced
Salsa (homemade or store bought)
2 cups grated cheese (I use a Mexican blend)
1 package of tortillas (any variety will do)
1 tomato (optional)
Sour cream (optional)
Cilantro, finely chopped (optional)
Lime wedges (optional)
1 tsp turmeric
1 tsp cayenne pepper
1 tbsp garlic powder
1 tsp cumin powder
1 tsp salt

Mix turmeric, cayenne pepper, garlic, cumin powder and salt together. Cover this mixture evenly over the chicken breast and let marinade for 20 minutes.

In the meantime, grill the green pepper and red onion so that it is slightly softened and charred. This should be done in a nice hot pan or on a grill pan and should only take about five minutes.

Cook the chicken breast on a hot grill. It should take a couple minutes on each side. Slice the thick part of the chicken breast to see if it is cooked. Remove from heat once cooked and slice chicken into strips, garnishing with cilantro if desired.

You can create an assembly line of all of the ingredients. Heat the tortillas either on a warm pan on the stove, in the oven, or for 10-15 seconds each in the microwave.


Let guests assemble their fajitas to their liking. It's a fun way for guests to be able to customize their meal. If you have vegetarians/vegans you could also grill some zucchini, eggplant or tomatoes; all of these would be a welcome addition to any fajitas.

Thursday, April 26, 2007

Veal Parmigiana


A friend asked me to put this up on my blog. I had never actually made veal parmigiana before, so I looked up some recipes online. It's definitely an Italian American favorite. You could change this recipe by substituting thin eggplant rounds or chicken breast.

I think the key to a good "Parmigiana" is to make sure that whatever the main event is (veal, chicken, eggplant) should be as thin as possible. For eggplant this just means slicing it carefully, but for veal and chicken it means pounding it thin. You can pound meat thinner with a special instrument like this, or you can just use something heavy like a rolling pin.

Veal Parmigiana
Makes approximately 8 servings

Ingredients
8 veal scallops
1/3 cup of olive oil
1 and 1/2 cups of pasta sauce (your favorite jarred sauce)
2/3 cup of Parmesan cheese
1 cup of plain breadcrumbs
1/2 cup of all purpose flour
1 tsp Italian seasoning
1 cup of mozzarella cheese (or 16 thin slices of fresh mozzarella)
2 eggs, lightly beaten
1 tsp salt
freshly ground pepper

Start by making sure the veal is thin enough, if not, pound it until it is very thin, approximately 1/2 a centimeter thick. Preheat the oven to 350 degrees. Next, mix the breadcrumbs, 1/2 a cup of the Parmesan, the Italian seasoning, and salt and pepper on a plate. Place the flour on to a plate. Place the beaten eggs on to a plate or into a shallow bowl. This is your assembly line.

Take each piece of veal through the assembly line; first, cover the veal lightly with flour. Next, dip and get a light coating of egg all over. Finally, cover the veal with the breadcrumb mixture. Make sure the veal is well covered with breadcrumbs. Repeat the process for your other pieces of veal.

Heat up your olive oil on a medium-high flame. When the oil is hot, add a couple of pieces of veal, cooking on each side approximately 2-3 minutes. Do not crowd the pan. You want the veal to be slightly brown and crispy on the outside. Remove veal from the pan and leave to drain on paper towels. Repeat process until all of the veal is cooked.


Lightly coat a oven safe dish with oil to prevent sticking. Add about a cup of the tomato sauce - just enough to cover the bottom of the pan with a thin layer. Next, add the veal. You can overlap pieces depending on the size of the pan. On top of the veal add the remainder of the tomato sauce. Finally, add the mozzarella over the top of the veal, and then sprinkle some Parmesan on top. Cover the pan with aluminum foil. Bake in the oven for 20-30 minutes. If you wish to brown the top, remove the foil for the last 5-10 minutes of baking, or put under a broiler for a minute or two.

I served my veal parmigiana with regular spaghetti and some extra tomato sauce.

Saturday, April 21, 2007

Salami and Prosciutto


These are some of the treats that I got from Calabria Pork Store on Arthur Avenue in the Bronx. The best part about the Pork Store was the variety of prosciutto's and salami's they had, and, the price! All of the delicious things I bought were only 5.99 per pound! If you go to a deli where they have more than the usual sopprosetta and genoa salami, try some new varieties. They each have their own unique flavors because of the way they have been cured; for example, some salami's are more peppery, and some are more garlicy. The dry air cured hams can also vary a lot in taste; there is the regular prosciutto, but you can also get varieties of pork which have had a combination of air drying and smoking. I love the smoked varieties of pork.


Prosciutto is a delicious savory treat. Try wrapping prosciutto around figs, or cantaloupe, or asparagus. The balance of salty and sweet can be extremely delicious and will have you coming back for seconds and thirds. Prosciutto can also make a delicious sandwich; try it on rosemary focaccia, with a little balsamic vinegar and extra virgin olive oil, fresh mozzarella and a ripe tomato. Or eat it plain with a nice piece of whole grain or nutty bread. I had prosciutto with a walnut baguette once and it was incredibly tasty.


Above is a photo of how you would traditionally cut prosciutto; I saw this traditional method being used in Italy at a market in Rome. The iron frame holds the meat in place, and you use a special foot long knife to gently slice across the top of the meat in a back and forth sawing motion. Slicing a prosciutto like this definitely takes a lot of practice and it's fun to observe and watch people slicing the meat this way.

Monday, April 16, 2007

Pesto with Fresh Egg Noodles


During my trip to Arthur Avenue, the Italian neighborhood in the Bronx, I visited a place called Borgatti's. All they do there is make fresh pasta of different varieties. People were ordering pounds of fresh pasta and ravioli as well as sheets of pasta to make homemade specialties.

When you order fresh noodles at Borgatti's, they take sheets of fresh pasta and ask what width noodles you would like. I didn't really know what size I wanted, so I picked a width somewhere in the middle, probably equivalent to a store bought linguine.

They take the pasta sheets and put them through their industrial sized noodle machine. Low and behold, the noodle sheets came out the other end of the machine in noodle form and in a big heap. After a dusting of semolina flour to keep them from sticking, they wrapped the noodles in paper and weighed them... I think the total came out to $1.73 and the quantity was over a pound. Mmm.. fresh egg noodles!


I was advised not to keep the noodles in the fridge for more than two days. So I had to decide quickly what to make with them. I hadn't made pesto in a long time and it sounded like it would be very good with my fresh noodles.

Pesto Sauce
Makes enough sauce for 1 lb of pasta

Ingredients
1 cup of Parmesan cheese
1/2 cup of pine nuts
1 large handful of fresh basil
6 cloves of garlic
1 tsp of salt
1/2 tsp freshly ground pepper
1 cup of olive oil

Combine cheese, pine nuts, basil, garlic, salt and pepper in a food processor. Add olive oil slowly to the mixture. You can blend the mixture until it is smooth, or leave it roughly chopped, it just depends on your preference. Either way, the end result will taste delicious.

Fresh pasta only takes about 5 minutes to cook. Once the noodles are done, pour sauce over them, and stir over heat until all the pasta has some sauce on it. Serve piping hot!

Sunday, April 15, 2007

Arthur Avenue


Yesterday I ventured to a famous Bronx spot; the legendary Arthur Avenue. It's considered to be one of the "Little Italy" spots in New York. After a rather long journey (almost 2 hours of bus riding!) I got off the bus. During the last hour of my bus ride, the scenery consisted of bodegas and fried chicken shops. When I rounded the corner on to Arthur Avenue, I was suddenly in a different world!

Arthur Avenue looks a little like something out of the movies; I felt like I would see men in suits standing on a corner with big black town cars nearby. Needless to say this was not exactly what I found, though I did see a huge 1980's black town car at one point! So maybe the mafia aren't in plain sight...

There are a plethora of shops and restaurants on Arthur Avenue; everything you could ever need to create delicious Italian food! The pleasant surprise was the price of most of what I bought. The only expensive items were the olive loaf and the prosciutto bread (but I've never seen prosciutto bread before so I had to try it!) from Madonia Bakery.


There are lots of deli's and cheese shops and pastry shops. I'll leave you with the image below of a deli in the market... lots of tasty treats! If you want more information on Arthur Avenue try www.arthuravenue.com or www.arthuravenuebronx.com.

Saturday, April 14, 2007

Walnut Vinaigrette


After seeing a tasty looking antipasto salad, I felt inspired to try my own. It was, unfortunately, mediocre at best. Why did this happen?

The ingredients were a good combination, and the dressing that I made turned out to be very tasty, but, my Italian style salad and my French style dressing did not fit together well.

In my antipasto salad I had salami, sharp provolone, thinly sliced red onion, romaine lettuce, red leaf lettuce and roma tomatoes. Yum! But not with my delicious salad dressing unfortunately!

Vinaigrette dressings come in all flavors. I added walnuts to mine to make the flavor more full and rich. The vinaigrette would have worked much better dressed over endive or escarole and goat's cheese; simple but still flavorful, not like my salad which had so many different elements and the dressing just got lost.

Walnut Vinaigrette
Makes about 1 and 1/2 cups of dressing

Ingredients
1/3 cup apple cider vinegar
2/3 cup extra virgin olive oil
1 tsp salt
1/2 tsp freshly ground black pepper
1 tsp whole grain mustard
1/2 cup of shelled walnut pieces

Blend together vinegar, salt, pepper, mustard and walnut pieces until the walnut pieces are finely chopped. My Cuisinart food processor makes easy work of this. Next, while the Cuisinart is turned on, slowly add the olive oil down the chute so that the mixture emulsifies. This means that the dressing will not be separated, like water usually separates from oil. It will all be blended together nicely.

When serving a salad to company, make sure that all of the leaves are lightly coated with dressing. The easiest way to do this is to mix the salad well with gloved hands.

Thursday, April 12, 2007

Asian Style Shrimp with Citrus Soy Sauce


Everyone LOVES this dish. I saw a similar recipe on a British TV morning show and made this version up. It's pretty healthy, and very tasty. Be careful if you have high cholesterol though; did you know that shrimp are fairly high in cholesterol?

Asian Style Shrimp with Citrus Soy Sauce
Makes four servings

Ingredients
2 lbs of raw shrimp (peeled and de-veined)
1/2 cup of finely chopped cilantro
1 tsp of red pepper flakes
5-6 cloves of garlic, finely chopped
1 bunch of spring onions chopped
1/2 cup of soy sauce (you can use reduced sodium soy sauce as well)
1/4 cup + 2 tbsp of olive oil
juice of one lemon
1 tsp of sesame oil (optional)

Toss the raw shrimp with the cilantro, red pepper flakes and garlic and marinade the shrimp for at least 20 minutes.

If you have a wok, add the two tablespoons of olive oil to it and heat it up. Otherwise, use a pan with a large surface area. Stir frying is a method in which you cook your food quickly. The more surface area your pan has and the hotter it is, the faster your food will cook.

When the wok is hot, add the shrimp to the pan, stirring continually. When the shrimp start to lose their gray color, add the spring onions and continue to stir. As soon as all the shrimp have lost their gray color, take the contents of the pan out with a slotted spoon (you want to leave the juices in the pan for the sauce).

Leave the shrimp in a covered dish so that they stay warm. In the wok, add the remaining ingredients to the juices that are left in the pan; the soy sauce, lemon juice, olive oil and sesame oil. Bring to a boil, and cook for a minute or two. If desired, reduce the sauce.

Serve the shrimp over white rice (I use basmati rice but any variety that you like would work). Pour some sauce on top of the shrimp and rice and enjoy.

Monday, April 9, 2007

Greek Style Green Beans


This was my Grandma's recipe. I'm not sure if it's Greek or not, but that's what she called it! For some reason it always tasted better when she cooked it, but, I think everything tastes better when your Grandma makes it!

Greek Style Green Beans
Makes 4-6 Servings

Ingredients
1/2 lb green beans (any variety will work so use what you prefer)
6 plum tomatoes quartered OR 1 can of diced tomatoes
1 large red onion, halved and then sliced
3 tbsp olive oil
salt to taste

I do not think there are easier instructions than for this recipe. Combine all the ingredients in a pot with a lid. It will look like this:


Cover and simmer until everything becomes tender, probably about 30 minutes. Stir occasionally. If the mixture is too dry and starts to stick, add a 1/4 cup of water.

You wouldn't think simple food could be so delicious, but just try it out, I think you'll be pleasantly surprised.

Wednesday, April 4, 2007

Ravioli with Bacon, Baby Spinach and Pine Nuts


I had some supplies sitting in the fridge from a recent trip to Costco, and searched to think of a recipe in which I could use a bunch of the ingredients.

Here is what I came up with. It's rich and filling!

Ravioli with Bacon, Baby Spinach and Pine Nuts
Makes 2 servings

Ingredients
1 11oz package of fresh ravioli (I used mushroom ravioli)
2-3 strips of bacon chopped into very small pieces
1 package of baby spinach
1/4 cup pine nuts
3 cloves of garlic thinly sliced
freshly ground black pepper
Parmesan cheese to garnish


This is a very simple recipe. Brown the bacon until crispy. Add the garlic until it starts to soften. Then add the pine nuts until they start to turn golden brown. If your ravioli is not ready at this point, turn off the mixture until the ravioli is ready.

Ravioli is easy to cook; gently place it in boiling salted water just as you would with pasta. The only trick is to not boil the ravioli too furiously; it will break them and the filling will come out. Simmer the ravioli gently according to the directions on the package - it usually only takes a few minutes.

When the ravioli is almost cooked, add the spinach to the bacon, garlic and pine nuts and add a bit of black pepper to taste. When the spinach starts to wilt, add the ravioli and stir gently until everything is mixed together. Be careful not to break the ravioli's open!

Serve with Parmesan cheese sprinkled on top.