Sunday, December 30, 2007

Snickerdoodles


Even in today's world of easy and inexpensive communication, it's difficult to really show how much you love someone. Some people exhibit their love through letters, and some through sending gifts in the mail; some people even send telegrams.

Lillian Cairns spends a lot of her time in Colorado baking cookies and mailing them countrywide to her children, grandchildren and great-grandchildren. By sending something homemade, she spreads the message that she is spending time and effort to get something off in the mail that her relatives will really enjoy and will remember her every time they take a bite of one of her delicious treats. Since Ms. Cairns cannot be there in person, sending cookies is her way of being present in the lives of her dear ones.


I've gotten to sample a few of Ms. Cairns cookies and her Snickerdoodles are my favorite (so far). They are not too sweet, which is one of the things I like so much since I do not have much of a sweet-tooth.


Snickerdoodles
Makes 5-6 dozen cookies

Ingredients
1 cup butter
1 1/2 cups sugar
2 eggs
2 3/4 cup flour
2 tsp cream of tartar
1 tsp baking soda
1/4 tsp salt
2 tbsp sugar
2 tsp cinnamon

Preheat the oven to 375 degrees Fahrenheit. Mix the butter, 1 1/2 cups sugar and eggs until smooth. In a separate bowl, blend the flour, cream of tartar, baking soda and salt. In 3 or 4 additions, add the flour mixture to the butter mixture until well mixed.

In a small bowl, mix the remaining sugar and cinnamon. Roll the cookie dough into one inch balls and roll in the cinnamon and sugar mixture. Place two inches apart on an ungreased cookie sheet.


Bake for 8-10 minutes. If you like cookies soft and chewy, make sure the cookies are removed from the oven before the bottom of the cookies brown. If you prefer crunchy cookies, leave them in the oven until the bottom is golden brown.

Let them cool on the sheet for a few minutes before removing the cookies to a baking rack until they are completely cool.

Saturday, December 8, 2007

Beef Fried Rice


I found this recipe in a Chinese cookbook. I changed the recipe a little because I did not use minced beef, instead, I thinly sliced it against the grain into thin strips.

The recipe is lovely; it's very mild with many subtle flavors coming through. My parents particularly like the ginger flavor that they could taste in the dish.

Serve this recipe with a simple stir fried green vegetable and I think you'd have a very tasty meal.

Beef Fried Rice
Serves 2 for lunch, or 3 with an additional dish

Ingredients
8 ounces of beef, (I used sirloin) finely sliced into 1/8-1/4 inch width strips against the grain
3 cups boiled rice, cooked in advance and fluffed with a fork to separate the grains
1 egg, beaten lightly
4 cloves garlic, minced finely
1/4 inch fresh ginger, peeled and minced finely
4 scallions, cut into small rounds and whites separated from greens
4 leaves of iceberg lettuce, thinly shredded
4 tbsp canola oil
1/2 tsp sugar
2 tsp thin soy sauce
2 tsp thick soy sauce
3 tsp Shaohsing wine or medium-dry sherry
1/2 tsp freshly ground pepper
1/2 tsp cornstarch or potato flour

Prep all of the ingredients and the rice. Add the sugar, soy sauces, 1 tsp of the wine or sherry, the pepper and the cornstarch or potato flour to the beef. Stir vigorously and marinade for 30 minutes. Blend 1 tbsp of the oil into the beef.


Heat the wok until it is very hot and add 2 tbsp of oil. Add the garlic, ginger and white part of the scallions and stir until fragrant, approximately 30 seconds.

Next add the beef. Stir continuously for about 30 seconds, and splash in the remaining 2 tsp of wine or sherry.


Finally pour in the egg and rice, and continue to stir for about 2 more minutes until everything is blended and heated through. It is important to stir gently so that the rice does not get broken up.

Remove the wok from the heat, and add the lettuce and green scallions, incorporating them carefully. Serve hot!

Wednesday, December 5, 2007

Pot Stickers


My family really likes dumplings, pot stickers, gyoza... anything of that sort. So when we had some leftover meat after making wonton soup, my Mom suggested that we try making pot stickers.

I was a little nervous about trying to make pot stickers with the wonton skins because they are so thin, but it worked beautifully. Follow my Wonton Soup recipe up until the step where you fold the wonton wrappers in half to form a triangle, and then follow the easy instructions below. Keep in mind that for pot stickers, no stock is necessary!

Pot Stickers
Makes 80-90 pot stickers

Ingredients
1 Wonton Soup recipe up until the point when you fold the wontons in half to a triangle shape
3/4 cup water (per batch of pot stickers that will fit into the pan)
1 tbsp of canola oil
1 large heavy bottomed pan, at least 2 inches deep and with a lid

This is very simple to do. First, heat the oil in the pan. Place the pot stickers into the pan. They can be very close together. Brown for 3-4 minutes.


Next, add the water into the pan. Bring to a boil, cover with the lid, and simmer for 5-7 minutes. This steams the pot stickers and ensures that the meat inside is cooked.

Uncover the lid and let the water evaporate. Continue to brown until golden and crunchy on the underside. Remove the pot stickers from the pan carefully so as not to break them apart. Serve immediately. I used Kikkoman Ponzu sauce as the dipping sauce.

Saturday, December 1, 2007

Minestrone Soup


Minestrone soup makes a nice comforting meal when it's cold outside. It's also got all kinds of good veggies in it, making it a healthy choice as well. To make it vegan, just change the chicken stock for vegetable stock, and use a substitute for the parmesan cheese. Don't be scared to use some creative license with your soup; if you have some extra veggies begging to be used, try adding them in. The overall taste of your soup will change slightly, but minestrone soup is all about taking what's leftover in the house and making a delicious meal.

Minestrone Soup
Feeds 4 for dinner

Ingredients
3 cloves of garlic
1 medium onion, chopped
2 stalks celery, chopped
1 carrot, grated
1-2 medium-large potatoes, cubed
1 green zucchini, cut into small pieces
1 can of chopped tomatoes
1 cup uncooked tube pasta
1 can of navy beans, drained and rinsed
8 cups of chicken stock
1 tbsp olive oil
Parmesan cheese to garnish
1 bunch of broccoli rabe (optional)


Heat the olive oil in a large pot. Add garlic, onion, celery, carrot and potato and saute until softened, about 10 minutes.

Next, add the tomatoes, and stock. Bring to a boil. Simmer for approximately 10 minutes.


Add the zucchini and the beans, and simmer for another 5 minutes.


Take off the heat, and add the broccoli rabe. Let sit for a further 5 minutes.

Serve hot and garnish with a nice helping of parmesan cheese.

Thursday, November 29, 2007

Wonton Soup


This recipe is amazing! It's the best wonton soup I've ever eaten - better than even the best Chinese restaurant. The greatest part is, it's even easier to make than I would have imagined.


Wonton Soup
Makes approximately 80-90 wontons

Ingredients
12 ounces of ground pork
4 ounces raw shelled shrimp, chopped into small pieces
2-3 ounces bamboo shoots chopped very small
6 scallions, chopped into thin rounds
1 egg yolk
1 egg white, lightly beaten
6-8 leaves lettuce or blanched chinese cabbage
1 1/2 quarts of chicken stock
1/2 tsp sugar
1 tsp thin soy sauce
1 tsp thick soy sauce
1/2 tsp freshly ground black pepper
1 1/2 tsp Shaohsing wine or medium-dry sherry
1 tsp cornstarch
3 tbsp water
2 teaspoons sesame oil

In a large bowl, mix the shrimp and pork with the cornstarch, sugar, soy sauces, pepper and wine. Then stir in the water one tablespoon at a time. Next it's time to take out some aggression. Take the entire meat mixture, pick it up, and throw it back into the bowl. Repeat this about 100 times.

Next, add the bamboo shoots and the white parts of the scallions to the meat mixture and marinate for about 30 minutes. Then blend in the sesame oil. Right before wrapping the mixture in the wontons, add the egg yolk to the mixture.


Now comes the fun part! I used Nasoya wonton wrappers and they worked well. It would have better if they were cut into perfect squares, but they were certainly sufficient for the task.


Its really easy to fold a wonton! First, put about a tsp of the mixture onto the middle of the square.


Second, use a brush and paint two edges of the wrapper and fold the noodle in half to form a triangle. Press the edges gently together.


Finally, put a little egg white on one tip, and fold the two tips together, joining them with the egg white you put on.


Here are a bunch of beautiful wontons, all waiting to be cooked! In one pan, gently heat the stock, and in another pan, heat water to a boil. When the water comes to a boil, place about 20 wontons in the pan. It will only take about 3 minutes to cook the wontons. When they are done, they float. Remove them carefully and place them in the stock. Repeat until all of the wontons are cooked.

Serve by garnishing with some finely shredded lettuce and scallions on top.

Monday, November 5, 2007

Chicken Burrito Bowl


I was craving Chipotle, but alas, there is no Chipotle within easy reach of where I live. So, I decided to scour the fridge to see if I could come up with something that would be similar. Turns out that I had no lettuce which really wasn't vital, but I also had no tortillas! Well, that didn't stop me. I still made the filling for the burrito, making what Chipotle calls a "burrito bol". It turned out pretty well, and I particularly enjoyed the marinade I made for the chicken.

Chicken Burrito Bowl
Serves 3 people for dinner

Ingredients For the Rice
1 cup of basmati rice
2 cups of water
Juice of one lime
1 tbsp of canola oil
1/2 tsp of salt
Handful of cilantro, finely chopped

Ingredients for the Pico de Gallo
2 medium sized tomatoes, diced
1/4 of a red onion, finely chopped
1 jalepeno, finely chopped
1 large handful of cilantro, finely chopped
Salt to taste

Ingredients for the Chicken
2 chicken breasts, sliced in half horizontally
1 tsp black pepper
1 tsp dried oregano
2 tsp cumin powder
1/2 tsp cayenne powder
1/4 of a red onion
6 garlic cloves
1 tbsp canola oil
1/2 tsp salt

Other Optional Ingredients
Black beans
Cheese
Guacamole
Lettuce
Sour Cream
Tabasco/other hot sauces


This recipe is very simple, especially with the help of a Cuisinart. Take all the ingredients for the chicken, except the chicken itself and blend them together in the Cuisinart. Spread the mixture over both sides of the chicken and marinade for at least one hour. When it comes time to cook the chicken, grill it on a hot grill, or in a fry pan (add a dash of oil to a fry pan so that the chicken doesn't stick) for about 2-3 minutes on each side. Cut the chicken into slices and serve hot.


For the salsa, simply combine all of the ingredients in a bowl. For the rice, I used a rice cooker, so that just involved putting everything, aside from the cilantro, into the cooker and hitting the "cook" button. Just before serving, I carefully stirred in the cilantro, without crushing the rice.


I mixed in some low sodium black beans, cheese, and red and green tabasco sauces with my rice, salsa and chicken. This is a great dish for guests because everyone can customize their bowl. Now I can make delicious burritos at home and not pine over the lack of Chipotle in my area!

Friday, November 2, 2007

Fruits of the Kuiseb Delta, Namibia


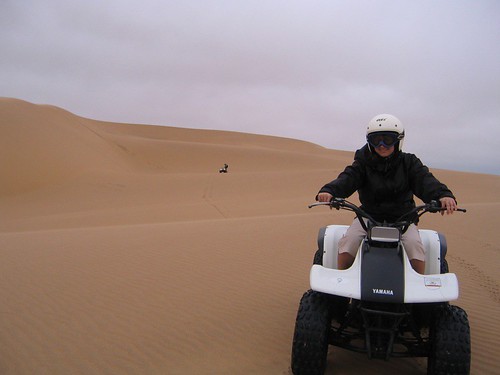
During my recent travels to Namibia, I went on a Historical Dune Tour with Fanie Du Preez, who owns Kuiseb Delta Adventures. As many of you know I am fairly well traveled, but I can honestly say that going with Fanie was one of the most incredible experiences I have ever had. Fanie is passionate about the delta and did a great job showing us everything. I had never been on a quad bike before, and Fanie was very patient and helpful in instructing me (at one point though he did mention that I was doing better than Angelina Jolie!). I highly highly recommend a trip to Namibia, and in particular going with Fanie to see the wonders of the Kuiseb Delta. His website is www.kuisebonline.com.

The reason why I am writing about my dune tour on my food blog is because Fanie showed us, among many other amazing things, two plants that are native to the Kuiseb Delta and I thought it would be interesting to share what I learned. The below information is supplied courtesy of Fanie. The first plant I will talk about is called the !nara (said with a clicking noise at the beginning) and the second, is the sirub.


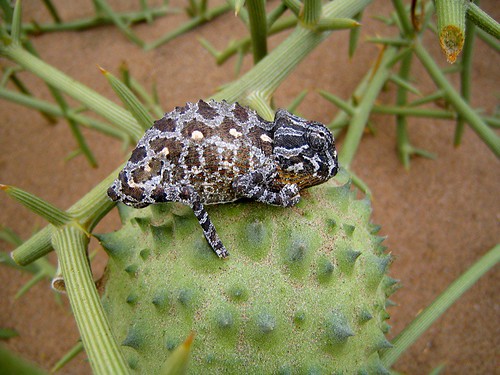
(A !nara fruit with a baby chameleon sitting on top.) See photo above.

The !nara (Acanthosicyos horridus) is a type of cucumber. It is a life giving plant to almost every species in the Kuiseb delta. The plant and fruit are eaten by humans, insects, gazelles, antelopes, jackal, brown hyena, rodents, birds and lizards.

The taste of the fruit is unfamiliar to all humans, except the Topnaar people who live in the delta. The fruit is in season from mid December until May. It contains a lot of water, protein, iron, and vitamins B, C and D. The raw seeds of the fruit contain up to 57% polyunsaturated oil. The fruit is ripe when it reaches 5 inches in diameter and tastes neither bitter nor sweet. The larger the fruit the sweeter it tastes. Female plants can bear many fruits every year.


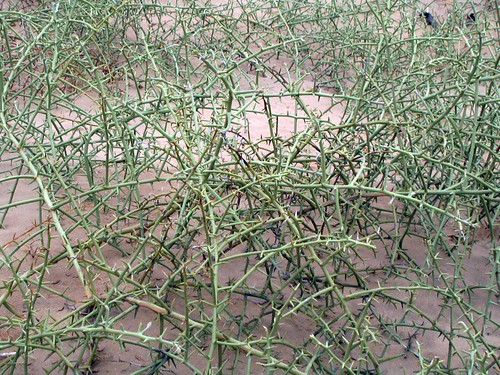
(The branches of the !nara. They are edible but very bitter tasting.) See photo above.

The !nara needs lots of water, but do not like getting wet from fog and rain. The whole delta has a fresh water aquifer underneath it and therefore there is very shallow water available. The Kuiseb delta is approximately 400 square km and is full of !nara. In winter there is more fog, and a black fungi forms on the stems and will quickly kill parts of the plant.


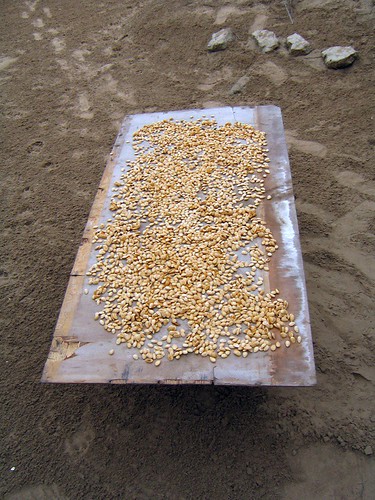
(The dried seeds of the !nara, ready to be exported.) See photo above.

The Topnaar people of the Kuiseb delta have woven their whole existence around this one fruit. When the fruit is almost ripe, they harvest it and bury it underneath the sand for three hot days. The hot sand hastens the ripening process. Then they cook the !nara’s in large pots for three hours, stirring all the time. Once cooked, the mixture is put through a sieve to separate the porridge from the seeds. The seeds are then dried in the sun and exported to Germany and Cape Town, South Africa. In Germany the nutty like seeds are used in confectionary and in Cape Town they are called butter pits and eaten like peanuts. The rest of the pot which is dried, rolled and eaten in between seasons is called Topnaar chocolate. I got to taste it and it was very similar to a fruit leather from Trader Joes. In season the Topnaar’s eat the raw !nara’s. They use the dried roots to make medicine against arthritis and diabetes, and they also smoke them.


(A sirub plant.) See photo above.

The second fruit we saw, and actually got to eat because it was ripe, was the sirub. The sirub (capparis hereroensis) fruits are eaten by the Topnaars, animals, rodents, birds, canivores and insects, while the leaves are eaten by the gazelle, oryx and ostriches. The roots are poisonous and used by the Topnaars as poison. The fruit tastes like banana, gooseberry, and elderflower.


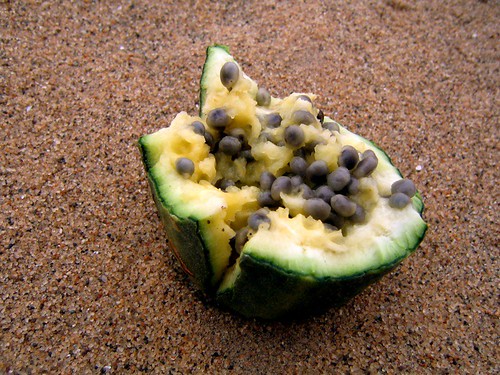
(An open sirub fruit. The yellow flesh, not the seeds, is eaten.) See photo above.

Both desert fruits are creepers and grow very quickly. They are the only plants who can survive the fast moving dunes of the delta. They grow up and over the slip faces of the moving dunes. The roots of both these plants are full of capillaries to enable them to carry the water up the high dunes. The roots are usually about 3 inches thick, but can be larger.

Tuesday, October 30, 2007

Buying Vegetables in India - The Vegetable Wallah


Just like Fresh Direct? Well, pretty much. In India, people selling a variety of things will come right to your door. The people who sell door to door build up a relationship with their clients.

In this case, it's the vegetable wallah, delivering vegetables to my Aunt. Because of the relationship between my Aunt and the seller, it is possible for her to order what she wants and he will bring it the next time he comes. If she chose to, she could also buy other vegetables that he brings with him the day he comes to make a delivery.


The vegetables are simply beautiful, but then again, a tropical climate lends itself to producing wonderful vegetables. The vegetable wallah carries the basket on his head, and then, once he reaches a client, weighs the vegetables and bags them up.

Of course, it's very possible to buy your vegetables, fruits, meats etc. at markets. There are also a few supermarkets that have shown up recently; it will be interesting to see if they succeed in driving smaller shops and vendors out of business.

Monday, October 29, 2007

Cheesy Broccoli Pasta


Yay for comfort food! My Papa was home and I wanted to cook something for him that he would really enjoy; he travels so much that he is constantly eating out and doesn't get simple home cooking. Some people would say that eating out all the time is great, but after I lived in a hotel for six weeks once, I didn't think I'd ever want to eat in another restaurant again.

This recipe is very quick, and should be ready in the amount of time it takes to cook the pasta. Aside from the calories from the cheese, it's pretty healthy too.

Cheesy Broccoli Pasta
Serves 2-3 people for dinner

Ingredients
1 tbsp of canola or light olive oil
1/2 tsp red pepper flakes
1/2-1 tsp freshly ground black pepper
4 cloves of garlic, chopped
1 medium onion, diced
4 medium tomatoes cut into eighths, or one can of chopped tomatoes
1 head of broccoli, cut in to bite size chunks
4-6oz of half fat white cheddar cheese
salt to taste
1/2lb of whole grain penne pasta

Put the water on the stove and heat it on high. Heat the oil in another pan which is big enough to hold the entire dish. Saute the onion, garlic, red pepper flakes and pepper until the onions are translucent and soft, about seven minutes. Add the tomatoes. Cook sauce on a low heat while prepping the rest of the dish, stirring occasionally.


Now the part that I find the most difficult; getting the broccoli to be at that perfect tender-crisp stage. I opted for the microwave on this occasion because it's quick and easy, but the broccoli could also be steamed or boiled. In the microwave, it'll take approximately two to three minutes (depending on the power of the microwave) for the broccoli to be cooked just enough but not overcooked. Set the broccoli aside, lid off, once it's finished so the steam does not continue to cook the broccoli.


Finally, if the cheese is not grated already, grate away! Set aside.

When the pasta is cooked, add it to the sauce, and stir until well mixed. Then toss the broccoli in. Finally, add the cheese at intervals, stirring after every addition. This will ensure all of the pasta is evenly cheesy. Serve piping hot.

Friday, October 26, 2007

"Jiffy" Corn Muffin Mix


Studying does not leave much time for cooking unfortunately. I was craving carbs last night and "Jiffy" corn muffin mix ended up coming to my rescue.

Needless to say, nothing could ever beat my Grandma's recipe for corn muffins/corn bread, but "Jiffy" is extremely good, and more importantly, extremely easy and quick to make. I don't think they've changed the packaging in my lifetime, and I don't think the price has gone up either. A box of "Jiffy" makes about 6 muffins, and it costs about 25 cents (or less sometimes!).


It's really easy to make the muffins. Just mix the dry ingredients with 1/3 cup of milk and an egg. The oven should be preheated to 400f and the muffin pan should be greased to avoid having half of the muffin stay in the pan when you try to dislodge them. I think the key to good muffins is to not over stir the batter. The moment the ingredients are blended, stop stirring! Don't be tempted to beat out the lumps, just leave the batter alone! Also, it's a good idea to let the batter sit peacefully in the muffin tin a few minutes before the tin goes into the oven. Between not over mixing and letting the batter sit, your muffins should be light and fluffy with a nice big muffin top. They take between 15 and 20 minutes to bake.

I'm Back!


I'm sorry I've been missing for the past couple of months; I've been traveling a bunch. I've been to London, Norway, India, South Africa, and Namibia. It's been great and I have a few photos to share with you in the upcoming days.

I've also been studying for the GMAT, which, if you don't know, is the exam you have to take to get into business school. I take the test in three weeks so wish me luck!!

The photo above is me standing on the top of Table Mountain, which is in Cape Town, South Africa. It was absolutely gorgeous there, and if you ever visit I suggest going when the southern wright whales come for breeding (the winter months of the Southern Hemisphere) because the whales come in so close to the shore that you don't even need to board a boat to see them. It's really stunning to experience.

Anyway, enough about traveling! More posts coming soon : )

Tuesday, June 12, 2007

Potato Bhaji


This recipe is very versatile, because you can switch the potatoes for other vegetables, for example cabbage or green beans. It's extremely simple.

In Indian cooking, it is important to know how to create the "forney" which is the oil and spices that flavor the entire dish. To make the "forney" one must heat up their oil, and then add various spices. The hot oil helps to release the flavor in the spices and also takes on the flavor combination of the spices that have been added to it.

The "forney" for this dish is what can be applied to the other vegetables.

Potato Bhaji
Makes 3-4 side portions

4 fresh curry leaves
1/2 tsp asephoetida
1/2 tsp turmeric
1 tsp mustard seeds
2 hot green chillies
4 medium size red potatoes, cooked, peeled, and chopped into large chunks
1 large red onion, thinly sliced
1/4 cup cilantro, finely chopped
1 tbsp canola oil
salt to taste

Heat the oil. Add the mustard seeds. Once the mustard seeds start to pop, add the asephoetida, curry leaves, turmeric and green chillies. The moisture from the curry leaves and green chillies will create some splattering so be careful not to get burned. If the oil seems like it is going to burn anything, remove it from the heat. Let these ingredients sizzle in the oil for a minute without letting anything burn. This is the "forney".


Next, add the onion. Cook until softened. Finally, stir in the potatoes. Cook for a few minutes, making sure the potatoes are properly coated with spices all over. Finally, add the cilantro. The cilantro should be added right at the end of cooking so it can maintain it's fresh taste and green color.

Eggplant Bhaji


I sometimes go to Jackson Heights, the Indian area in Queens, New York. There are tons of restaurants, jewelry shops, and clothing shops all within a couple block radius. Every time I step off the subway into this neighborhood I feel as if I am stepping into a different world. The food, the smells, the music, the ladies dressed in saris; they are all little reminders of the world which exists thousands of miles away in India.

One thing that's great about this neighborhood are the prices of the items in grocery stores. On this occasion I stocked up on red onions, an eggplant, small green chillies and a bunch of roma tomatoes. In Manhattan these ingredients would cost at least three times as much.

Here is what I made with the ingredients I purchased in Jackson Heights.

Eggplant Bhaji
Makes 6-8 side portions

Ingredients
1 eggplant cubed
4 roma tomatoes, roughly chopped
1 large red onion, diced
2 hot green chillies, sliced in halves
4 cloves of garlic, finely chopped
1/2 tsp of turmeric
2 tbsp of canola oil
salt to taste


Heat oil. Saute the turmeric, onions, chillies, and garlic in oil until softened. Add the eggplant. Continue to cook on a medium heat until eggplant starts to soften. At this point add the tomatoes. Continue to cook gently until the eggplant is fully cooked. Add salt to taste. The entire cooking process will take approximately 30 minutes. Eat with rice or pita bread or naan or a roti; whatever carbs you have will be a good accompaniment.

Sunday, June 3, 2007

Tomato Soup


This recipe is a real classic. It's rich and warm, and goes perfectly with a nice grilled cheese sandwich. Plus, it's way more nutritious than the Campbell's variety!

Tomato Soup
Makes 3 servings

Ingredients
1 carrot, peeled and chopped
1 onion, sliced
1 can of diced tomatoes
1 ounce of butter
1 tbsp of flour
1 bay leaf
1 pinch of nutmeg or mace
500ml of water
salt and pepper to taste

Melt the butter in the pan. Add the carrot and onion and sweat them until they are soft, about 5 minutes. Next, add the flour, stirring constantly for 2 minutes. It is important to make sure that the flour has cooked, otherwise there will be a terrible raw flour taste in the soup.

Add the remaining ingredients to the pot. Stir thoroughly and make sure there is no flour stuck to the bottom. Simmer for 30 minutes, stirring occasionally.

Finally, it is necessary to puree the soup in a food processor. This can be done when the soup is hot or cold, but if it's done when the soup is hot, precautions must be taken so as not to burn oneself.

Tuesday, May 22, 2007

Chicken Tikka Wrap


I was having some friends over for dinner, and decided to try out this recipe on them. A twist on a chicken fajita, I really think anyone will like this recipe. To add nutrition try putting a wider variety of veggies in the wrap; baby spinach, grilled zucchini or grilled eggplant would be a welcome addition.

Chicken Tikka Wraps
Makes about 6 wraps

Ingredients
4 boneless skinless chicken breasts
1/2 cup yogurt
3 cloves of minced garlic
2 tsp paprika
1/2 tsp cayenne pepper(or more for increased spiciness!)
1/4 tsp cumin powder
1/4 cup lemon juice
freshly ground black pepper and salt to taste
6 naans (pita or a tortilla would work also)
2 cups of chopped lettuce
1 tomato, diced
2 red onions, sliced
1/2 cup of cilantro, finely chopped
1 lemon, cut into at least 6 wedges

Pound the chicken breasts until they are 1/2 an inch thick. Mix yogurt, garlic, paprika, cayenne, cumin, lemon juice, salt and pepper. Place the mixture in a zip lock bag with chicken breasts. Let the chicken marinate for 1-3 hours.

Place onion slices on a hot grill pan and char slightly. Once the onions have softened, remove from grill pan. Place the chicken on a hot grill pan, cooking 2-4 minutes on each side until cooked. Remove and let stand for 3-5 minutes; this will help the chicken to retain it's natural juices.

Slice the chicken into strips. Make an assembly line of all of the remaining ingredients and let guests put together their chicken tikka wrap.