Sunday, March 25, 2007

Pasta Bean Soup


I love this soup. It's hearty and delicious. I usually make a big pot of it and then freeze it into single portions for nights when I don't have time or don't feel like cooking anything. It'd be easy to make this soup vegetarian or vegan, by substituting the bacon for an extra two tablespoons of olive oil and changing the chicken stock to vegetable stock.
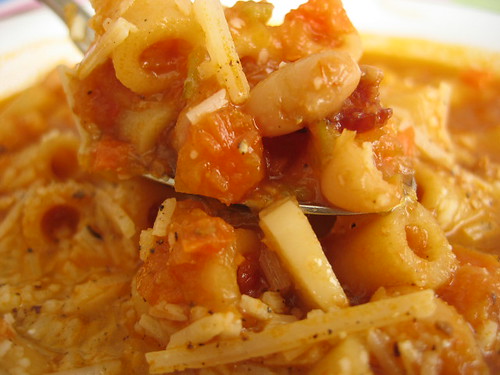
Pasta Bean Soup
Makes 6-8 servings

Ingredients
2 strips of bacon, diced
2 tbsp olive oil
2 medium onions, chopped
3-4 carrots, peeled and chopped
3-4 stalks of celery, chopped
3-4 cloves of garlic, sliced thinly
1 small can of tomato paste
1 tsp dried rosemary
2 cans of navy beans, drained and rinsed
1 cup of short tubular pasta
2 32fl oz cartons of chicken stock
Salt and freshly ground pepper to taste
Parmesan or pecorino romano cheese to garnish


Brown the bacon until crispy. Then add the olive oil, carrots, onions, celery, garlic, rosemary, salt, and pepper. Sweat them until they are soft. Sweating means to cook something, often with a covered lid to create steam, until it softens and without browning it. Add the tomato paste to the pot and cook for a minute, stirring constantly so the tomato paste does not burn.

Next, add the beans and stock. Bring to a boil, then reduce to a simmer. After about ten minutes, if you like your soup thicker, mash up some of the beans. Taste for salt and pepper and adjust as necessary.

Finally, add the pasta and cook until al dente. Serve piping hot with a bit of cheese sprinkled on top.

Wednesday, March 21, 2007

Indian Fish Fry


Frying fish the Indian way brings back a lot of good memories from my childhood. I remember watching my dad wash and season the fish. My job was always to cover the fish in rice flour right before it went into the fry pan. When I got a little older, I wondered how he actually made his fish. Turns out it's incredibly easy.

Indian Style Fish Fry
Serves 2-3 people

Ingredients
1 lb of flounder fillets (or another mild, white fish)
Juice of 1/2 a lemon
1 tsp of turmeric
2 tsp of garlic powder
1 tsp of cayenne powder
Salt to taste
1/2 cup of canola oil
Rice Flour

This dish works well with a mild fish; the flavors of the spices are delicious and it's nice not to ruin that. I like flounder, it's very thin. The thinner the fish is, the more flavored with the spices it will be and the crispier it will get when you fry it.

Start by making sure your fish is thoroughly washed and fairly dry. If your fish is giving off that fishy odour, a good trick is to soak it in some milk. Let it sit in a milk bath for about 20-30 minutes and then rinse. Doing this should help bring back the freshness of the fish.

Fresh fish does not give off a fishy odor, so if you go to buy fish and it has a strong smell, it might be best to pass on it and try another store or another day of the week when a fresh shipment may have arrived. Once, in China, I was taken to a fish market, and there literally was no odor, flies etc. The fish had all been caught that morning (many of them were still alive) and were being butchered on the spot. Too bad it can't always be done like that!

Once your fish has been cleaned, combine all the ingredients with the fish. Make sure the spices cover each piece of fish evenly. You can let this marinade for a while, but it really isn't necessary. If you do decide to let it marinade, make sure it goes back into the fridge. It's a good idea to keep seafood on ice as well.

When you are ready to fry your fish, put about a cup of rice flour on to a large plate. Dip your fish pieces into the flour and make sure coat evenly. Heat your oil up to a fairly hot temperature. Once hot, place fish in the pan. Do not crowd the pan. It only takes about a minute on each side for very thin fish, longer if your fish is thicker. Drain on paper towels. It's great to serve right away if possible, so you can enjoy it while it's nice and hot.

Tuesday, March 20, 2007

Mango Mousse


A personal favorite of mine. Nothing beats this rich and creamy, yet refreshing desert. I've used fresh mangoes as a garnish. You can vaguely see the letters ARF inscribed in the mousse; this is because we were having a food competition at work and I wanted extra brownie points for having the company name included in our food. Just an FYI, ARF stands for the Advertising Research Foundation. If you are interested in advertising, and advertising research, check out their website. Your company may be a member of the ARF and you might not even know it!

A guide for garnishes: don't ever garnish something that is not edible, does not enhance the dish and/or not reflect something from the dish you've just made. For example, a big stick of rosemary used as a garnish for a steak dinner is not good. You can't really eat a sprig of raw rosemary. Another example would be putting a couple of mint leaves on an apple tart. The mint may look nice, but it does not give the eater a chance to guess what flavors they might be about to experience. A good garnish could be strawberries on top of a cake that has some sort of strawberry jam in the middle. Or you could sprinkle pasta with fresh chopped parsley or basil leaves so long as they were included in your sauce.

But back to the mousse. As you will soon see, this recipe is very simple. One of the keys to making this recipe a success is the presentation. Due to the lack of dishes I have at my apartment, I had to use a large corningware dish, which, lets be honest, is not ideal. This desert would look lovely in some sort of wine or champagne glass. The best part is, you prepare the mango mousse ahead of time so it's already to serve to your guests.

Mango Mousse
Makes 10 servings

Ingredients
1 pint of whipping cream
1 or 2 sachets of Knox non-flavored gelatin
1 large can of Mango Pulp (available easily at an Indian grocer)

Dissolve the gelatin according to the package. You can play around with the amount of gelatin you use; the more you use, the firmer your mousse will set. I used one sachet for my mousse, but I think next time I make it I will use more because I'd like it to be firmer.

Put the gelatin into a large mixing bowl with the whipping cream. Whip to a stiff peak. Stiff peak means that when you take out your utensil that you have been whipping with, it will leave a little mountain that does not fall down. Do not overwhip your cream and turn it into butter!

Then fold in the mango pulp. Once blended, you can transfer it into the dishes that you will be serving it in. Put the mango mousse into the fridge to let it set. I'd leave it in the fridge at least two hours. You can definitely prepare this the day before.

I garnished it with fresh mangoes on this occasion; but raspberries or raspberry coulis would be great garnishes too. Although they are not in the dish, they add a nice flavor and contrast to the sweetness of the mango.

Monday, March 19, 2007

Sugar on Snow

sugar on snow

A few weeks ago I traveled to Banff in Alberta, Canada. Little did I know I was going to fulfill a childhood fantasy on the trip. If you are a girl you probably remember the Little House Books. It is in these books that Laura Ingalls Wilder and her family make Sugar on Snow. Sugar on Snow is maple syrup that has been boiled to a certain temperature (approximately 10 minutes of boiling), poured out over a clean bed of snow and then rolled up on a popsicle stick. The result is a gooey and very sweet treat. We made our Sugar on Snow while snowshoeing. In the above photo you can see our guide Tim making Sugar on Snow. You can see his snowshoes as well. I only fell down once on those contraptions. Our guide Tim was very nice and knew a lot about the area. I highly recommend the tour company we used, which is called Discover Banff Tours.